The Crossroads of the Aether

My knitted wool top hat
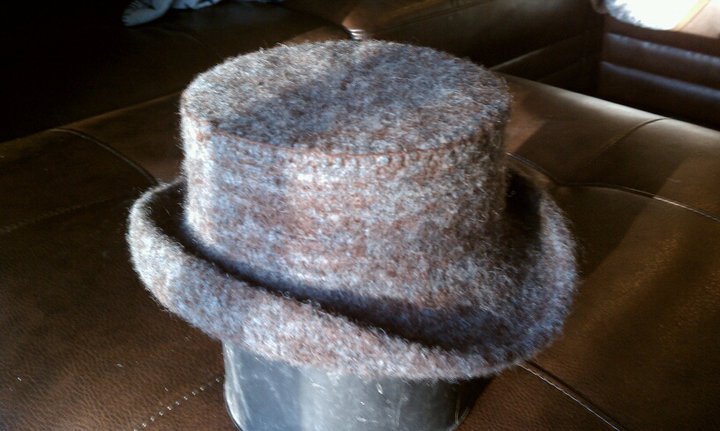

I was asked how I made my hat and I figured I should do a write up. It started when I found this site and a pattern for a tricorn hat:
http://knitlikeapirate.com/projects/tricorn.shtml
I recommend thoroughly reading that article site and getting comfortable with the process. I modified the plan itself but the overall procedure is the same for most of it. My directions will make a little more sense if you directly compare to those instruction as they are written slightly better.
So this may not be the best way, but it's how I did it. As well I've only been knitting for about a month and this is my 3rd hat tried.
Start:
Cast on 108 placing stitch markers after 10, 10, 14, 10, 10, 10, 10, 14, 10, 10.
I number my markers 1-10 so that I know when I've made a complete round.
I then knit 14 rounds. The directions have alternating knits and purls for a bit but I found it posed no real difference and I don't like doing purls.
I'll use (M#) to indicate where my markers are
Round 15: k8, k2tog, (M1) k8, k2tog, (M2) k14, (M3) k2tog, k8, (M4) k2tog, k8, (M5) k8, k2tog, (M6) k8, k2tog, (M7) k14, (M8) k2tog, k8, (M9) k2tog, k8 (M10)
Round 16: knit
Hatband:
Round 17: Purl
Round 18: Knit
Crown:
Round 1: k3, k2tog, k2, k2tog, (M1) k3, k2tog, k2, k2tog, (M2), k3, k2tog, k2, k2tog, k3, kt2tog, (M3) k3, k2tog, k2, k2tog, (M4) k3, k2tog, k2, k2tog, (M5) k3, k2tog, k2, k2tog, (M6) k3, k2tog, k2, k2tog, (M7), k3, k2tog, k2, k2tog, k3, kt2tog, (M8) k3, k2tog, k2, k2tog, (M9) k3, k2tog, k2, k2tog, (M10)
Round 2: Purl
Round 3-25: Knit (this is the pictured hat, I'm doing another where I'm doing about 60 rounds here to make it a taller hat)
Top decreases:
Take out half your stitch markers, so you have a marker at the beginning of your round and at 14, 18, 14, 18, 14 stitches
If you have double-pointed needles, this might be a good time to switch to them. ( I just used a 16 inch round as my local store didn't have size 13 double endeds.)
Repeat this 2 round pattern 4 times:
Round 1: k2tog, knit to marker, repeat
Round 2: slip-slip-knit, knit to marker, repeat
Round 9: k2tog, k4, (M1) k2tog, k3, k2tog, k3, (M2) k2tog, k4, (M3) k2tog, k3, k2tog, k3, (M4) k2tog, k4 (M5)
Round 10: k2tog, k3, (M1) k2tog, k2, k2tog, k2, (M2) k2tog, k3, (M3) k2tog, k2, k2tog, k2, (M4) k2tog, k3 (M5)
Tippytop:
Now you should have 24 stitches.
Round 11: k2tog, repeat (12 stitches left)
Round 12: k2tog, repeat (6 stitches left)
Break the yarn, leaving a longish tail, and thread the needle. Catch the stitches on the extra yarn and pull it tight.
From here follow the felting procedure:
http://knitlikeapirate.com/techniques/felting.shtml
To shape the hat I found a bowel that was close to the same size as my head and drew the wet felted hat down squarely so that it was even in height. I used rubber bands to hold the hat in place. This ended up being a bad idea as it made ribs in the hat that would not come out after it was dried unless I resoaked and did some hand felting. On the next hat I'm planning on a single rubber band at the top and then maybe a wide over lapping ribbon wrapped around and around and then a rubber band at the bottom. I also did a fairly tight "plain blanket stitch" with a needle and yarn diagonally through the side/top of the hat to help define the shape. As well I shaped out the brim by hand, checking back every few hours to make sure it was still a satisfactory shape.
Stiffening:
I let it dry for a day or 2 until it was thoroughly dry, a fan can help, but not direct heat. I then used a 2:1 ratio of denatured alcohol (2) and shellac (1) in a small spray bottle (all 3 things were purchased at my local hardware store) and soaked down the top “corner” and sides of the brim with this solution. Let it dry until it stopped stinking. I sprayed areas I wanted stiffer a 2nd time and let dry again. I made sure to try not to spray the hat band area as I wanted it to remain a little flexible for wearing.
I think that covers how I did it. Feel free to ask questions and I'll try to answer best I can.
Replies to This Discussion
-
 Permalink Reply by James R. Murray on
 -
That is absolutely BRILLIANT!
-
 Permalink Reply by Erin Latimer on
 -
Love the tall one! Sadly I'm all thumbs and it would probably be a disaster if I tried to make it!
-
I could not tell it was knitted. Very good job, Looks great!!!!
-
 Permalink Reply by Felix Horonigus Ameldubar on
 -
As my good buddy Darth would say "Impressive. Most Impressive!"
-
 Permalink Reply by Jannine Hewitt on
 -
Of course the glues used in hat making sent the workers mad - hence the Mad Hatter in Louis Carroll's Alice in Wonderland. Very ingenious. I made a hat from felt using white glue, watered down slightly - it worked well.
-
 Permalink Reply by glenda mieni on
 -
just would like to say this is absolutely magnificent i shall try to make one though it will not be as impressive as yours
-
 Permalink Reply by M. Leigh Hood on
 -
I am tremendously impressed. Very well done!
-
Brilliant!
What yarn did you use?
-
WOW that is awesome,
-
 Permalink Reply by Lady Beatrice Lee Harvey on
 -
I am so excited to try this!
-
 Permalink Reply by Sister Earth ~ Dianne Keast on
 -
Wow your hats came out great!
- ‹ Previous
- 1
- 2
- 3
- Next ›
© 2015 Created by Hephzibah Marsh.
